Sugar Free Cookies and Cream Ice Cream
This post may contain affiliate links.

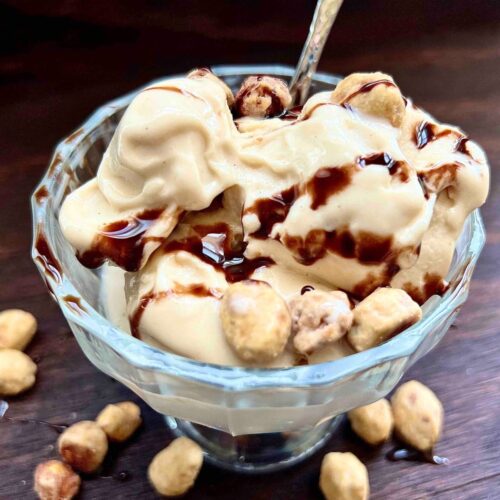
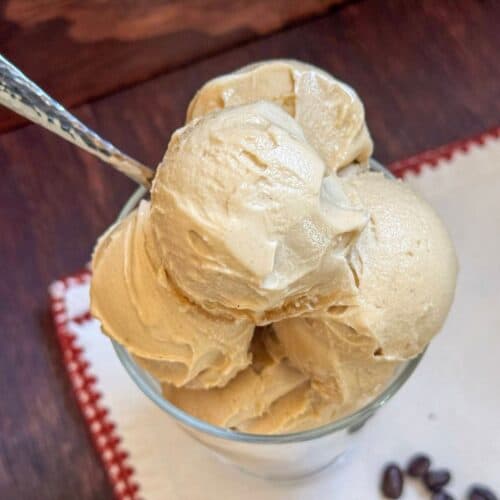
Ninja Creami Cookies and Cream Ice Cream gives the classic cookies-and-cream flavor you love in a lighter, protein-packed scoop. It's creamy and smooth without relying on sugar or high-fat ingredients-just delicious, healthy goodness in every bite.
For more healthy ice cream recipes with fun mix-ins, make my Ninja Creami S’mores Ice cream and my Peanut Butter Oreo Ninja Creami.

Recipe at a Glance
This sugar-free Cookies and Cream protein ice cream delivers 61g protein, just 416 calories, and 20g net carbs per pint-using cottage cheese, whey protein, allulose, and sugar-free cookies for a guilt-free treat that outperforms store-bought options.
⏱️ Prep Time: 10 minutes
❄️ Freeze Time: 24 hours
🍽️ Servings: 1 pint
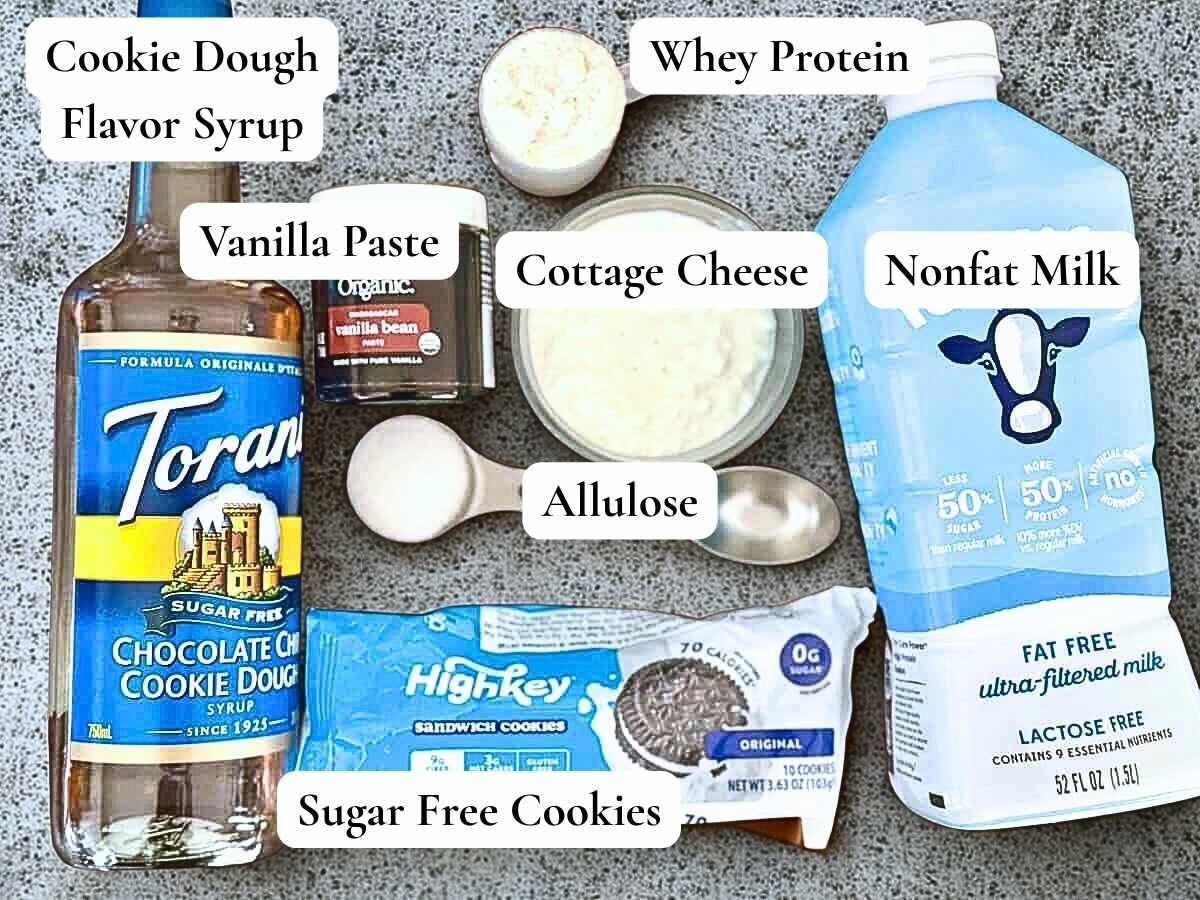
🛒 Featured Ingredients: Whey isolate, cottage cheese, allulose, sugar-free cookies
🍎 Dietary Swaps: See Key Ingredients section for possible substitutions.
SUMMARIZE & SAVE THIS CONTENT ON
When craving something sweet and actually satisfying, this sugar‑free Ninja Creami Cookies & Cream ice cream hits all the right notes - creamy, high‑protein, and totally delicious.
If you love homemade healthy ice cream that's better than store brands, you'll also want to try my Chocolate Peanut Butter Protein Ice Cream, my Mounds Bar-inspired Ninja Creami swirl protein ice cream, and my tropical favorite: Healthy Ninja Creami Coconut Ice Cream.
Unlike typical desserts that can leave you craving more, these protein‑packed Ninja Creami recipes actually help keep you full - with none of the added sugar and all of the flavor. If you're an Almond Joy lover, my Almond Joy ice cream recipe is next on your must‑make list.
Key Ingredients
For this protein-packed cookies and cream ice cream, you will need:
2% Cottage Cheese– This serves as a binder in the recipe for creamy, thick ice cream. Since we will blend it, do not worry about the texture! And no, you can’t taste it at all.
If you really can’t stomach the idea of cottage cheese, Greek yogurt works as well. You can also use a dairy-free yogurt if needed, but be sure to choose a high-protein variety to protect the ice cream texture.
Vanilla Whey Isolate Protein Powder– It may seem like this recipe uses a lot of protein, but the amount of whey isolate used creates a thick, scoopable texture.
If you use another type of protein powder, the quantity might need to be adjusted. I suggest starting with a scoop and a half, unless using casein–in that case, use only 1 scoop.
Sugar-Free Cookie Dough Flavor Syrup– I’m obsessed with the Torani Sugar-Free cookie dough syrup. It adds a warm, buttery taste to your ice cream, perfect for enhancing the cookie flavors.
Granulated Allulose– While this recipe uses many simple ingredients, it also calls for allulose, which I know may not be common. Allulose is my sweetener of choice due to the neutral taste and good safety profile. See the FAQs section later in the post for more information on allulose.
Of course, you can swap for any 1:1 sugar substitute you like. I don’t recommend leaving the sugar substitute out–the freezer will mute the sweetness in the protein powder, so an extra boost is needed.
Sugar-Free Sandwich Cookies— You need a sugar-free dupe for Oreo cookies–one such brand is Highkey. They are very low-calorie–three cookies for 70 calories? Yes, please!
How to Make Sugar-Free Cookies & Cream Ice Cream:
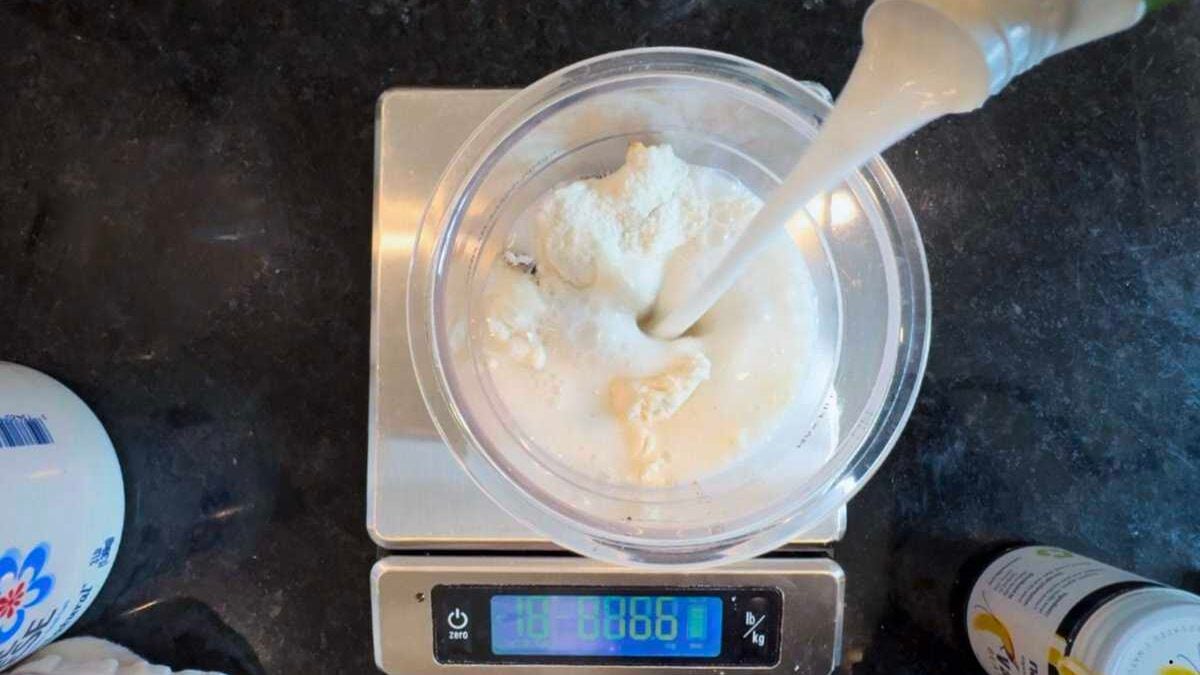
1. Combine Ingredients.
Add cottage cheese, protein powder, cookie dough flavor syrup, allulose, vanilla bean paste, and enough nonfat milk to reach just below the max fill line to your Ninja Creami pint container.
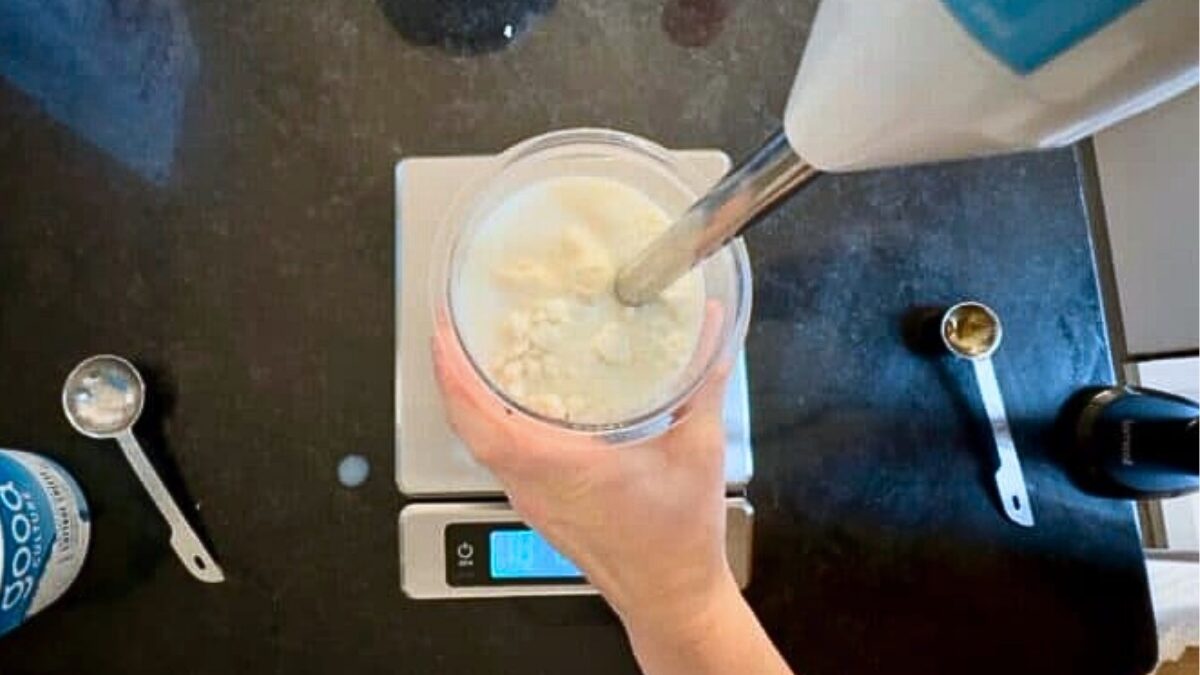
2. Blend Ingredients.
Use your immersion blender to blend everything until smooth. If you do not have an immersion blender, you can use a smoothie cup in a regular blender; just be careful not to over-froth the mixture.
3. Freeze for 24 hours.
Place a lid on your pint container and set it on a level surface in your freezer for at least 24 hours.
Pro Tip: Some people leave the lid off their pint container when freezing because it can lessen the bump that sometimes develops on top.

4. Spin Ice Cream.
When ready to eat, put your pint container in the outer bowl of the Ninja Creami, then secure the lid with the blade attached. Install the pint in your Ninja Creami machine, then press the Lite Ice Cream button and wait for the cycle to complete.
While your ice cream spins, you can grab your sugar-free cookies and cut them into halves or quarters to have them ready for the next step.

5. Prep Mix-Ins.
After your spin cycle completes, remove the outer bowl lid to check the texture of the ice cream. If it is mostly smooth, it’s time to move on to our mix-in cycle!
Note: You do not need a perfect texture at this point, but it should be close. If you check the ice cream and it’s powdery and crumbly, do one more spin using the “Re-Spin” button before going to the mix-in cycle.
Use a knife or spoon to dig a well in the middle of the ice cream. Try to go down all the way to the bottom of the pint. Take your cookie pieces and press them down into the well you dug, making sure to push all the way to the bottom.

6. Final Spin.
Once you add your cookie bits, you do your final spin using the “Mix-In” function.
Once it finishes, you should have delicious, smooth, and creamy Ninja Creami protein ice cream!
Ninja Creami Expert Tips
Use a good-quality protein powder with a natural taste. Anything too artificial-tasting can be overpowering in ice cream. If you don’t like drinking the protein as a shake, you won’t like it in ice cream, either.
If you need to swap any of the ingredients, read the notes in my Key Ingredients section.
Resist the urge to swap too many ingredients or change the ingredient quantities. Swaps you think won’t make a difference actually do, and they can throw off your final ice cream texture in a big way.
If you are new to making Ninja Creami protein ice creams, be sure to follow the recipe closely. If you’re having issues with your Ninja Creami machine, check out my Ninja Creami Troubleshooting Guide.
Sugar-Free Cookies & Cream Ice Cream Macros
| Nutrient | Amount (per pint) | Notes |
|---|---|---|
| Calories | 416 | - |
| Protein | 61.2 g | - |
| Fat | 6.9 g | - |
| Total Carbohydrates | 52.2 g | Includes carbs from Highkey cookies |
| Net Carbohydrates | 20.2 g | The majority of total carbs come from sweeteners not metabolized by the body. |

Ninja Creami Cookies & Cream FAQs
Sugar’s purpose in ice cream is two-fold: one, it sweetens it. It is a dessert after all, not to mention that freezing mutes the natural flavors in your other ingredients, and sugar can help bring those flavors back out.
Second, sugar lowers the freezing point of the liquid, which is essential for using your Ninja Creami machine without damaging it or getting subpar results.
This is why it is a good idea to replace the sugar in the recipe with another sugar substitute. In this recipe, we use allulose. Other natural choices are erythritol, monk fruit, and stevia. You may also choose to use artificial sweeters, like sucralose (Splenda).
Yes, allulose is a great choice for sugar-free ice creams!
Allulose is a monosaccharide. Monosaccharides lower the freezing point of a mixture similar to sugar. Lowering the freezing point of the ice cream mixture is necessary to protect your machine from breaking during the spin cycles.
Another neat fact about allulose is that it can also slow the rate of melting! This means your ice cream will be more scoopable after spinning and not degrade as fast.
A recent study also shows that allulose had GLP-1-like effects in the group who consumed it, making them actually eat less overall and helping them with their fat loss goals, which is helpful when indulging in a treat like ice cream.
Dairy milk contains natural sugars (lactose). Most people looking for a sugar-free treat are not concerned about the natural sugars in something like milk, which is filled with calcium, vitamins, minerals, and protein, far outweighing any possible negatives with the small amount of natural sugar.
That said, if you must avoid dairy, you can use coconut milk. Note that even unsweetened varieties have a small amount of natural sugar from the coconut flesh, usually a gram or two more than the same amount of cow’s milk. So do not choose coconut milk to avoid natural sugar.
Nut milks will have the lowest amount of natural sugar per serving, but their results in ice cream are a little less thick and creamy, so there is a trade off.
Other Ninja Creami Recipes
Visit my Ninja Creami Recipes page for even more ideas!


Want More Recipes Like This One?
If you love my Ninja Creami recipes and want some more fun flavors like S’Mores, Pistachio, Monster Cookie, Black Forest Cake, or even Moose Tracks, check out my Ninja Creami Recipe eBook!
The recipe book is available for instant download and offers delicious recipes in an easy-to-access eBook without any ads.
Make this Ninja Creami Cookies and Cream recipe today!
Then, please leave a comment and a 5-star rating! It helps others find my recipes, and it means the world to hear from every reader.
📖 Recipe

Ninja Creami Cookies and Cream Ice Cream
Equipment
- Ninja Creami Ice Cream Maker Required–will not work in other ice cream makers
Ingredients
- 100 grams 2% cottage cheese about 1/2 cup
- 50 grams Whey Isolate Vanilla Protein Powder 1 1/2 scoops–Must be whey isolate, see notes
- 1 teaspoon Vanilla Bean Paste
- 2 tablespoon Sugar Free Cookie Dough Flavored Syrup optional–see notes for adjustments if omitting
- 1 tablespoon Granulated Allulose or Sugar-Free Sweetener Blend of Choice
- 1 cup Nonfat Milk
- 3 High Key Sugar Free Sandwich Cookies
Instructions
Instructions for Ice Cream Base
- Set your Ninja Creami Pint container on a kitchen scale and tare the weight. Add 100 grams of cottage cheese and 50 grams of vanilla protein powder. If you don't have a scale, use 1/2 cup of cottage cheese and 1 1/2 scoops of protein powder.
- Now add the rest of your ingredients except for the sandwich cookies–vanilla bean paste, cookie dough flavor syrup, granulated allulose/sweetener, and nonfat milk.
- Use an immersion blender to blend the mixture directly in the pint container until smooth.
- Transfer your Creami pint to the freezer. Freeze on a flat and level surface for 24 hours.
Blending Instructions
- When your pint has frozen for at least 24 hours, attach the pint container to your Creami lid & blade per manufacturers instructions for your model. Spin on "Lite Ice Cream".
- While the ice cream is spinning, take 3 High Key sandwich cookies and cut each one in half.
- When the spin is complete, remove the lid and check the consistency of your ice cream. If it is crumbly and powdery, reattach the lid/blade and put it back in your machine. Hit the "re-spin" button to do one more spin. If it is mostly smooth, skip to the next step.
- Take a spoon and dig out a well in the middle of your pint. Take your sandwich cookie halves and stick them in the middle of the well. Press them down into the ice cream. Replace the lid/blade on your pint and then put it back in the machine. Press the "Mix In" button.
- Enjoy!
Video


This is so delicious! One of my favs so far.