Easy Whole Grain Red Wheat Sourdough
This post may contain affiliate links.


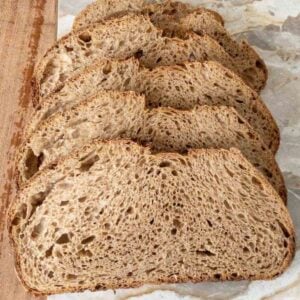
Time to craft your own easy whole-grain red wheat sourdough bread from scratch! This beautiful loaf is wonderfully rustic in color and flavor while having a delightfully fluffy texture and nutty taste. This is everything you’re looking for in a whole wheat bread!

There’s something incredibly satisfying about baking your own wholesome, whole-grain sourdough bread.
The entire process of sourdough amazes me. I think about how incredible our natural world is and am just amazed at how the diversity of organisms work together for our good, even the organisms we can’t see (like the bacteria used to leaven sourdough!)
Anyway, I’ve always been into baking for health. My bread may not win any awards for its aesthetics, but it is fluffy, delicious, and full of wonderful nutrition.
Check out the infographic below about some of the many wonderful benefits of whole grain sourdough! Some of these things are just not possible in the more popular sourdough recipes using refined white flour.

Sourdough is a pretty magical food, isn’t it?
Anyway, I wanted to share my sourdough recipe using 100% hard red wheat. It’s pretty similar to my other 100% whole wheat sourdough recipe, but it gives a much nuttier, rustic flavor.
Recipe Ingredients
For this easy whole grain red wheat sourdough recipe, you simply need:
- Whole Grain Red Wheat Flour
- Filtered Water
- Sourdough Starter
- Salt

Sourdough Instructions:

1. Mix Dough
Using a food scale, weigh out 500 grams of red wheat flour. Add 100 grams of healthy sourdough starter (bubbly or unfed starter both work, as long as it’s well-maintained & healthy), 425 grams of water, and 12 grams of salt. Stir all the ingredients together thoroughly. Mix well, using hands if necessary, to form a shaggy dough. All you’re aiming for right now is that it’s mixed well and there are no dry bits of flour. It doesn’t need to be smooth or a ball.
Cover the dough and let it rest for 30 minutes.

2. Stretches & Folds
After your 30-minute rest, begin the stretches & folds. You will do a total of 4 sets.
Grab the dough from the edge and pull up as high as the dough allows without ripping, then fold the dough down to the middle. Repeat, working your way around the whole bowl, until the dough is tight and no longer wants to stretch. Let the dough rest 30 minutes, then do another set of stretches & folds. Repeat this cycle until you have completed four total sets of stretches and folds.
You may do as many as 8-12 stretches in the first set, and as few as 4-5 in the last set as the gluten develops and tightens more quickly.

3. Bulk Fermentation
Transfer your dough to a clear, straight-sided container. Wet the back of your hand and press down on the dough to flatten it so you can mark the starting point for the rise on the side of the container. Mark that starting point, then measure the volume of your dough. If your container has measurement marks, use those. If not, just use a ruler. Take the temperature of your dough with a thermometer. For a dough temp close to 75 degrees, aim for a 50% rise and mark the goal line for your rise to help you track. For a 70-degree dough, aim for a 50% rise. Adjust your target rise accordingly for other dough temps (see this post for more info).

4. Pre-Shape
Once the dough rises to your target, pour the dough out on a clean work surface and pre-shape. This is where you lightly form it in a ball to help build structure–I do this with an easy set of stretches & folds to form a ball, and then roll the ball over so the smooth side is on top and I do a couple tucks to pull it tight. Let it rest for about 20 minutes.

5. Shape
Turn your dough ball back over so the smooth part is down on the counter. Press the dough into a rectangle with your hands. Shape it into a boule or batard, however you prefer. You can watch my video to see how I shape mine.

6. Proof
Cover and place in the fridge for 8 hours (up to 48 hours).

7. Prep for Baking
After the cold proof, pre-heat a lidded baking vessel (such as a 3-quart dutch oven or other baking pan) to 450 degrees Fahrenheit.
Once the oven is pre-heated, remove the dough from the fridge. Turn it out onto a piece of parchment paper or a dough sling and score it down the middle.

8. Bake
Carefully remove the preheated pan from the oven. Transfer your scored loaf to the baker. Spray it 10 times with a spray bottle of water. Quickly place the lid on the baker and then put back in the oven. Bake at 450 degrees for 30 minutes.
After 30 minutes, remove the lid. Lower the oven temperature to 425°F and bake for another 13-15 minutes until the interior temperature of the dough reads at least 205°F.
Allow to cool until the bread reaches room temperature before slicing (if you can…I know it’s hard! Nothing’s better than warm bread fresh from the oven. But allowing it to fully cool gives the best crumb).
I mean… just look at this bread. It’s so soft, so airy… not at all the heavy and dense like the bricks I used to end up with!
It all comes down to having enough liquid in the recipe, putting the work in to develop good gluten structure (the stretches & folds) without overdoing it–it’s finding the sweet spot with fermentation. And then using a covered baker, especially a smaller, cozy one that can “hug” the loaf a bit as you see in my pictures above, helps it keep good structure in the oven while it’s baking.

Would you like to save this?
Tips & Variations
- Feel free to try different combinations of whole grain flours or other types of red wheat, such as rouge de bordeaux and yecora rojo. While this is written for red wheat, you can substitute some of the red wheat for other whole grain flours if you wish. Results may vary.
More about Whole Grain Sourdough
Baking sourdough with whole grain flours, especially if you freshly mill your own wheat berries, can be a learning curve.
I have written a free eBook about the whole process of whole grain sourdough where I am able to get much more in-depth than I can in a single recipe post.
You can also check out my Tips for Baking with Fresh Milled Flour guide.
To get this free eBook, sign up for my weekly email newsletter and it will be emailed to you immediately!
Other Whole Wheat Sourdough Recipes
Here are some other delicious whole grain sourdough recipes:

Whole Wheat Sourdough Bagels
These chewy, tangy whole wheat sourdough bagels can be made with discard or active starter!

Cranberry Sourdough Bread
This whole-grain cranberry orange sourdough is the perfect lightly-sweet variation on a traditional sourdough boule!

100% Whole Wheat Sourdough
100% whole wheat sourdough that is light, fluffy, and completely nutritious!

Can I Use Sourdough Starter Straight from the Fridge?
Wondering if you HAVE to pre-feed your starter before baking? Check out the sourdough starter experiment I did to find out!

Whole Wheat Sourdough with Whey
This 100% whole wheat sourdough sandwich bread is made with whey strained from yogurt for amazing texture and flavor!
Whole Wheat Sourdough Nutrition Stats
The following stats are an estimate based on my macro-calculator of choice (MacroFactor). Your results may vary.
For 1/12 of the loaf, the nutrition stats are as follows:

- Calories: 150
- Protein: 6 grams
- Fat: 1 gram
- Carbs: 33 grams
- Fiber: 5 grams
Fresh Sourdough Storage
This bread is best eaten within a few days for optimal freshness. However, keep it in an airtight container and it can last up to a week!
You may also wish to freeze half the loaf if you don’t think you can eat it quick enough. This bread thaws well but can also go straight from the freezer to the toaster.
Helpful Equipment
Here are some of my favorite items for making great loaves of sourdough bread.
- Food Scale – I love this one specifically because the panel pulls out which makes it easier to use with big bowls.
- Bench Scraper – A simple bench scraper is cheap and helps so much with shaping!
- Bannetons –
- Lame (Scoring Tool) –
- Full Kit – Better yet, you can get a full kit for a very reasonable price!
Don’t Have a Starter?
If you want to make your own whole grain bread but don’t have a sourdough starter, check out my fresh milled whole wheat bread recipe.
📖 Recipe
Easy Whole Grain Red Wheat Sourdough
Equipment
- Clear, straight-sided Container for bulk ferment–optional, highly recommended
- Bench Scraper for shaping–optional, but helpful
- Banneton
- Dough Lame or sharp knife for scoring
- Lidded Baking Pan Such as 3-qt dutch oven
- Spray Bottle filled with water
Ingredients
- 500 grams Whole Wheat Flour Hard Red Wheat
- 425 grams Water
- 100 grams Sourdough Starter Active or unfed okay
- 12 grams Salt
Instructions
- Using a food scale, measure out 500 grams of flour, 100 grams of sourdough starter, 425 grams of water, and 12 grams of salt into a mixing bowl. Stir together thoroughly until it makes a shaggy dough. Let rest 30 minutes.
- Perform stretches & folds. Grab the edge of the dough and pull up until you get resistance, but be careful not to rip it. Fold the dough back down to the other side of the bowl. Work your way around the whole ball of dough, doing 8-12 stretches and folds. Let dough rest 30 minutes in between, and repeat this 3 more times for a total of four sets of stretches and folds with 30-min rest in between.
- Right after the fourth set, transfer your dough to a clear, straight-sided container to monitor the bulk ferment. Wet the back of your hand to press down & flatten the top of a dough. Make a mark on the outside of your container to mark the dough's starting point. Assuming a dough temperature of 75 degrees F, aim for a 50% rise. Do a 75% rise if your dough is 70 degrees. Adjust rise up or down accordingly for a warmer or cooler dough.
- When your dough reaches its rise target, pour dough out onto the counter and complete a pre-shape with light stretches & folds to make the dough into a ball. Using a bench scraper, turn the ball over so the smooth side is facing up. Let dough rest 20 minutes.
- Use your bench scraper to turn the dough ball back over, smooth side down. Flatten the dough gently into a rectangle with your hands and shape your loaf into a batard or boule. Using your bench scraper if needed, pick your shaped dough up and place it into the banneton, smooth side down. Pinch the seam together tightly to create more surface tension.
- Cover and place in the refrigerator for 8 hours (or up to 2 days).
- When ready to bake, put a baking vessel, such as a dutch oven with a lid into the cold oven and pre-heat your oven to 450 degrees. When the oven is ready, pull your dough out of the fridge. Turn it out onto a piece of parchment paper or dough sling. Using a lame or sharp knife, score the dough down the middle. Pull the baking pan or dutch oven out of the oven. Remove the lid and carefully place your dough inside. Spray the top of your loaf 10 times with a water bottle, then quickly replace the lid.
- Put the bread in the oven and bake at 450 degrees for 30 minutes with the lid on. Remove the lid after 30 minutes. Lower the oven temperature to 425 degrees and bake for an additional 13-15 minutes until the interior temperature of your loaf is at least 205 degrees F.
- Cool on a wire rack for at least 6 hours to prevent a gummy crumb when slicing. Enjoy!


Have you ever tried adding vital wheat gluten? Recipe taste is great. Wondering if it would rise more.
Hello! Yes, I have used vital wheat gluten—it definitely does help! You could try adding between 1 to 2 tablespoons and see how it goes!
Excited to try your recipe! Have you ever made it with an autolyse or fermentolyse?
Yes! 🙂 I always do at least 30 min fermentalyse. This recipe includes salt in the fermentalyse (I think typical fermentalyse instructions do not) as I found it easier to not forget the salt that way and it didn’t seem to hurt final results. But you can hold the salt back and add it after the fermentalyse, too!
Good Day!
I have been trying to make whole grain sourdough bread for a year and stumbled across your site this week. I’m so happy with the turn out of this bread! It if fluffy!! Thanks for sharing all your wisdom!
Thank you Joanne! 🙂 I’m so glad you liked it!
Wheat bread isn’t my favorite, but made a loaf for hubby. I am not sure if it is your recipe or sourdough wheat bread in general, but I love the taste of this bread, the sour makes it! Will make this one again.
The one feedback I have is please give an approximate time for the first rise. Mine was over 12 hours. I was worried over the time, but all worked out.. I think, my loaf is a little flat. Did I do something wrong?
Glad you loved it! Whole wheat sourdough bread does tend to stay a little flatter than white flour sourdough (the bran & germ are denser and heavier). However, you can play around with techniques to improve the rise to some degree. Just depends how flat it was and what your preferences are!
The time for the first rise will vary greatly depending on room temp, starter strength, etc. I’ve had rises go as fast as 4 hours and some as long as 12. So the best way to monitor is to really watch your dough, but I know it’s a bit more work that way, too.
How much does your finished loaf weigh? I am trying to track my nutrition, and recently purchased a loaf that seems to be very similar to yours. I have the weight of it, but now need to try to figure out if it is about the same size as yours so I can get a rough estimate of the calories and other macros. Thank you!
The finished loaf is about 830 grams 🙂